If you've been searching for an easy gluten-free dessert that actually delivers on flavor and texture, these chocolate-caramel apple slices are about to become your new obsession. I've been gluten-free for over 10 years, and as a future Registered Dietitian, I'm always testing recipes that don't sacrifice taste for dietary needs. This one hits every mark.
Here's the trick that makes these apple slices better than any caramel apple you've had: we're coating the apple first with chocolate before adding the caramel. That chocolate layer creates a barrier that keeps the apple crisp and prevents the caramel from sliding off. It's a game-changer. No more sticky, soggy apples that fall apart before you can take a bite.
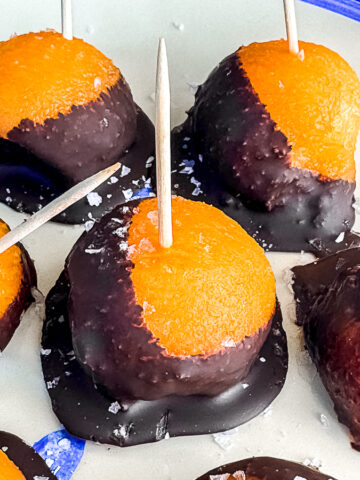
These gluten-free caramel apple dessert slices come together in about 30 minutes with just five main ingredients. The combination of tart Granny Smith apples, rich dark chocolate, buttery caramel, toasted pecans, and flaky sea salt creates layers of flavor and texture that feel way more impressive than the effort required. They're perfect for fall gatherings, dessert boards, or when you need something sweet that won't weigh you down. This no-bake chocolate apple slice recipe is ideal for busy weeknights or last-minute entertaining.

Why This Gluten-Free Apple Pecan Snack Recipe Works
The secret is in the layering technique. By dipping the apple slices in melted chocolate first, you create a moisture barrier that keeps the fruit crisp and gives the caramel something to cling to. I learned this method after years of making traditional caramel apples that would get soggy within hours. This approach keeps everything stable and fresh-tasting.
Using thick apple rounds instead of whole apples also makes these easier to eat and more versatile for serving. You can arrange them on a platter for parties, pack them for snacks, or serve them alongside my Easy Cashew Chicken Salad Recipe for a sweet-savory lunch combo. The portion control is built in, which I appreciate when I'm trying to balance enjoying dessert with my nutrition goals.
Ingredients You'll Need
For the base, you'll want:
- 2 large green apples (Granny Smith work best for their tartness)
- 1 cup semi-sweet or dark chocolate chips
- 1 tablespoon coconut oil or butter
- ½ cup soft caramels or caramel sauce
- ¼ cup chopped pecans, lightly toasted
- Flaky sea salt, for topping
- Optional: wooden sticks or skewers for serving
All of these ingredients are naturally gluten-free, but always check your chocolate chips and caramel labels if you have celiac disease or severe gluten sensitivity. I use King Arthur Gluten Free Measure for Measure Flour in other recipes, but this one doesn't require any flour at all, making it even simpler.

Equipment
Silicone Baking Mat Essential for preventing the chocolate from sticking and making cleanup effortless. I use these for all my gluten-free baking to avoid cross-contamination.
Nordic Ware Half Sheet Pan The sturdy, flat surface prevents warping and ensures your apple slices chill evenly. Commercial-quality pans make a difference when you're working with chocolate.
Microwave-Safe Mixing Bowls Glass or ceramic bowls distribute heat evenly when melting chocolate, preventing scorching. I keep a few sizes on hand for different coating tasks.
Kitchen Shears Helpful for trimming parchment paper and cutting caramel into smaller pieces if using caramel candies instead of sauce.
How to Make Chocolate-Caramel Apple Slices
Step 1: Prep the Apples Slice your apples into rounds about ¼ to ½ inch thick. Use a small knife or apple corer to remove the seeds and core from each slice. Pat them completely dry with paper towels. This step is critical because any moisture will prevent the chocolate from adhering properly.
Step 2: Insert Sticks (Optional) If you want that classic caramel apple look, gently insert a wooden stick or skewer into the bottom of each apple slice. This makes them easier to dip and more fun to serve at parties. I usually skip this step when making them for meal prep or dessert boards.
Step 3: Melt the Chocolate Combine your chocolate chips and coconut oil in a microwave-safe bowl. The coconut oil helps thin the chocolate slightly, making it easier to work with and giving it a smoother finish. Heat in 20-second intervals, stirring between each one, until completely smooth. Don't rush this step or you'll end up with seized chocolate.
Step 4: Dip the Apples Spread or dip the back side of each apple slice in the melted chocolate. You want a generous coating that covers the entire surface. Place each coated slice on your parchment-lined baking sheet. Pop the tray in the refrigerator for 10 to 15 minutes until the chocolate firms up completely.
Step 5: Add Caramel and Pecans If you're using caramel candies, warm them slightly with a splash of cream until they're pourable but not too thin. If using store-bought caramel sauce, a quick 10-second warm-up makes it easier to work with. Spoon or drizzle the caramel over the chocolate side of each apple slice, then immediately sprinkle with chopped pecans so they stick.
Step 6: Finish with Chocolate Drizzle & Salt Reheat any remaining chocolate if needed and drizzle it over the caramel and pecans in a decorative pattern. While the chocolate is still soft, sprinkle with flaky sea salt. This is where the magic happens. That hit of salt amplifies the sweetness of the caramel and brings out the chocolate's depth.
Step 7: Chill & Serve Return the tray to the refrigerator for another 10 to 15 minutes until everything is set. These are best enjoyed the same day while the apple is still crisp and the chocolate has that perfect snap. Store any leftovers in an airtight container in the fridge for up to 24 hours.

Tips for Perfect Results
Choose the Right Apple Granny Smith apples are ideal because their tartness balances the sweet caramel and chocolate. Their firm texture also holds up better under the weight of the toppings. Honeycrisp works well too if you prefer a sweeter base.
Toast Your Pecans Spend the extra five minutes to toast your pecans in a dry skillet. It intensifies their flavor and adds a deeper nuttiness that elevates the whole dessert. You'll taste the difference.
Work Quickly with Chocolate Chocolate sets fast, especially when you're coating cold apple slices. If your chocolate starts to thicken while you're working, pop it back in the microwave for 10 seconds to loosen it up.
Don't Skip the Salt Flaky sea salt is non-negotiable here. It cuts through the richness and makes every component taste more like itself. I use Maldon sea salt and keep it on my counter for easy access.
Serve at the Right Temperature These are best served slightly chilled so the chocolate is firm but not rock-hard. Pull them from the fridge about 5 minutes before serving for optimal texture.
Variations to Try
Make Them Dairy-Free Swap the butter for coconut oil (which you're likely already using) and choose dairy-free chocolate chips. Most store-bought caramel sauces contain dairy, so you'll need to make your own with coconut cream or buy a certified dairy-free version.
Switch Up the Nuts Almonds, walnuts, or hazelnuts all work beautifully in place of pecans. You could even try pumpkin seeds for a nut-free option that adds crunch.
Add Peanut Butter Spread a thin layer of natural peanut butter on the apple slice before dipping in chocolate. It adds protein and creates a flavor profile similar to my Buffalo Breaded Chicken with Celery Slaw, where unexpected combinations just work.
Try White Chocolate Use white chocolate instead of dark for a sweeter, creamier coating. The contrast with the tart apple is stunning.
Make Mini Versions Cut your apple slices smaller for bite-sized treats that work perfectly on dessert boards alongside options from my Gluten-Free Chicken Cornbread Casserole for a complete meal spread.

Storage and Make-Ahead Tips
These apple slices are best enjoyed fresh within 6 to 8 hours of making them. The longer they sit, the more the apple releases moisture, which can make the toppings slide. That said, if you need to prep them a few hours ahead, they'll hold just fine in the refrigerator.
Store them in a single layer in an airtight container, separating layers with parchment paper if you need to stack them. Don't leave them at room temperature for more than an hour or the chocolate will soften and the apple will brown.
Serving Suggestions
I love arranging these on a wooden board with other snacks for casual fall entertaining. They pair wonderfully with cheese, crackers like Ella's Flats Everything 3-Pack, and a selection of nuts. You can also serve them alongside savory dishes for a sweet contrast. Try them after my White Bean and Bacon Soup or Roasted Whole Chicken for a complete meal.
For drinks, these pair beautifully with non-alcoholic aperitifs or a simple sparkling water with lemon. The richness of the chocolate and caramel calls for something crisp and refreshing.
Why You'll Love This Recipe
As someone who's been navigating gluten-free eating for over a decade, I've learned that the best recipes are the ones that don't feel like compromises. These chocolate-caramel apple slices aren't "gluten-free treats." They're just treats. Everyone loves them, regardless of dietary restrictions.
The fact that they come together quickly with ingredients you probably already have makes them even better. No special gluten-free flours or hard-to-find substitutes. Just real food combined in a way that maximizes flavor and texture.
They're also incredibly satisfying without being heavy. The apple provides natural fiber and vitamins, the pecans add healthy fats and protein, and the chocolate and caramel are portioned in a way that feels indulgent without overdoing it. This is the kind of balanced approach to food that I'm learning to embrace in my dietetics training.
Frequently Asked Questions
Pat your apple slices completely dry and work quickly once they're cut. The chocolate coating creates a protective barrier over most of the exposed surface. For extra insurance, you can lightly brush the edges with lemon juice before dipping, though I rarely find this necessary with the chocolate layer.
Absolutely. Skip the pecans entirely or substitute with toasted pumpkin seeds (pepitas) for a similar crunch. Sunflower seeds also work well. The recipe is just as delicious without nuts, though you'll miss that buttery pecan flavor.
Store them in a single layer in an airtight container in the refrigerator for up to 24 hours. Place parchment paper between layers if stacking. Don't leave them at room temperature for more than an hour or the chocolate will soften and the apple will start to release moisture.
Traditional caramel apples are naturally gluten-free since caramel, apples, and chocolate don't contain gluten. However, always check labels on store-bought caramel and chocolate chips to ensure they weren't processed in facilities with gluten-containing products if you have celiac disease or severe sensitivity.
Semi-sweet or dark chocolate chips work beautifully. I prefer dark chocolate with 60-70% cocoa for its rich flavor that balances the sweet caramel. The coconut oil or butter helps thin the chocolate for easier dipping and creates a smooth, glossy finish.
This is where the chocolate-first method shines. Coating the apple in chocolate before adding caramel gives the sticky caramel something to cling to. Make sure your chocolate layer is completely set before adding caramel, and don't make your caramel too thin or warm.
Granny Smith apples are ideal because their tartness balances the sweet toppings and their firm texture holds up well. Honeycrisp, Pink Lady, and Fuji also work beautifully. Avoid softer varieties like Red Delicious or McIntosh that will get mushy under the weight of the chocolate and caramel.
These are best enjoyed within 6 to 8 hours of making them for optimal texture and crispness. The apple will start releasing moisture over time, which can soften the chocolate and make toppings slide. They'll still taste good the next day, but the texture won't be as crisp.
More Gluten-Free Recipes You'll Love
If you enjoyed these chocolate-caramel apple slices, you'll want to try my Gluten-Free Sweetgreen Harvest Bowl Recipe for another fresh, seasonal option. The Easy Open-Faced Chicken Sandwich Recipe is perfect for lunch, and my Gluten-Free Chicken Teriyaki brings similar sweet-savory balance to dinner.
If you're looking for quick snacks, the SNACKBOXPROS Gluten-Free Snack Box is filled with options that I keep stocked in my pantry.

Caramel Pecan Chocolate-Dipped Apple Slices
Equipment
- Silicone baking mat or parchment paper
- Half sheet pan
- Microwave-safe mixing bowl
- Spoon or offset spatula for spreading
Ingredients
- 2 large green apples sliced into thick rounds (about ¼-½ inch)
- 1 cup semi-sweet or dark chocolate chips
- 1 tablespoon coconut oil or butter
- ½ cup soft caramels or caramel sauce
- ¼ cup chopped pecans lightly toasted
- Flaky sea salt for topping
- Optional: wooden sticks or skewers for easy dipping
Instructions
- Prep the Apples: Slice apples into rounds and remove seeds or cores. Pat slices dry with paper towels to help the chocolate stick.
- Insert Sticks: Gently insert a wooden stick or skewer into each apple slice (optional but makes them fun to serve).
- Melt the Chocolate: In a microwave-safe bowl, combine chocolate chips and coconut oil or butter. Heat in 20-second intervals, stirring until smooth.
- Dip the Apples: Spread or dip the back side of each apple slice in melted chocolate. Place on a parchment-lined tray and chill for 10-15 minutes until the chocolate firms up.
- Add Caramel and Pecans: Warm the caramel slightly until pourable. Spoon or drizzle caramel over the chocolate side, then sprinkle with chopped pecans.
- Finish with Chocolate Drizzle & Salt: Drizzle more melted chocolate over the top for a layered look. Sprinkle with a pinch of flaky sea salt while the chocolate is still soft.
- Chill & Serve: Refrigerate for 10-15 minutes until set. Serve fresh and enjoy within the day for the best texture.
Notes
Toast pecans in a dry skillet for 3-5 minutes to intensify their flavor
Work quickly when coating apples, as chocolate sets fast on cold fruit
Store in an airtight container in the refrigerator for up to 24 hours
These are best enjoyed within 6-8 hours of making for optimal texture