Looking for a gluten-free Halloween treat that's actually fun to make with kids? These Chocolate Banana Mummies check every box: spooky, simple, and packed with fruit instead of artificial dyes. I've been making these every October for the past three years, and they've become my go-to for Halloween parties and after-school snacks.
Here's the trick that makes these better than any other banana mummy recipe out there: slicing your banana lengthwise instead of into rounds. This gives you longer pieces that actually look like mummies (not just wrapped banana coins), and the chocolate chips nestle perfectly into the natural curve of the banana. Plus, the lengthwise slices create more surface area for the puff pastry to stick to, which means your "bandages" actually stay wrapped during baking instead of unraveling into a pastry mess.
As someone who's been gluten-free for over 10 years and is currently studying to become a Registered Dietitian, I've tested dozens of gluten-free puff pastry brands and techniques. The key is working quickly with cold pastry and not overthinking the wrapping—imperfect gaps are what make these look authentically mummy-like.
These gluten-free banana mummies are naturally top-8 allergen-friendly (just swap for dairy-free chocolate chips if needed), which makes them perfect for school Halloween parties or trick-or-treat alternatives. They're ready in 30 minutes from start to finish, and the combination of flaky pastry, warm banana, and melted chocolate is honestly better than most candy.

Why This Gluten-Free Halloween Dessert Works
The beauty of this recipe is its simplicity. You need just five ingredients (six if you count the candy eyes, which you absolutely should). Unlike elaborate Halloween cookies that require special cutters and royal icing skills, these banana mummies come together with basic pantry items and straightforward techniques any home baker can master.
The puff pastry provides that satisfying flaky crunch, while the banana stays tender and naturally sweet inside. When you bite through the golden pastry into the warm fruit and melted chocolate, it's the perfect balance of textures. And because bananas are naturally high in potassium and fiber, parents can feel good about serving these at Halloween gatherings alongside the inevitable candy haul.
I've served these at gluten-free potlucks, school parties, and family Halloween dinners, and they disappear faster than any store-bought treat. The presentation is impressive enough that guests assume they're complicated, but here's what makes them work: they take less time than making Easy Gluten-Free Egg Bites for breakfast.
Equipment
Baking sheet – A sturdy half sheet pan ensures even heat distribution and prevents warping at high temperatures. This is the foundation of good baking.
Parchment paper or silicone baking mat – These reusable silicone mats prevent sticking and make cleanup effortless. They're also better for the environment than disposable parchment.
Sharp knife or pizza cutter – You'll need this to slice the puff pastry into thin, even strips. A pizza cutter actually works brilliantly here and gives you more control than kitchen shears.
Pastry brush – Essential for applying the egg wash evenly. A silicone brush works better than natural bristles and cleans up easily in the dishwasher.
Small bowl – For whisking your egg wash. Any of these glass mixing bowls work perfectly.

Ingredients & Substitutions
Gluten-free puff pastry (1 sheet, thawed) – This is the star ingredient. I recommend thawing it in the refrigerator overnight rather than on the counter, which keeps it cold enough to work with but pliable enough to cut. If you can't find gluten-free puff pastry locally, standard puff pastry works for non-gluten-free households.
Ripe banana (1 medium) – Look for yellow bananas with a few brown spots. They're sweeter and hold their shape better during baking. Too-green bananas will be starchy and bland, while overripe bananas can get mushy.
Chocolate chips or chopped dark chocolate (about ¼ cup) – Semi-sweet or dark chocolate works beautifully. For a dairy-free version, use dairy-free chocolate chips. Mini chocolate chips are easier to tuck into the banana curves.
Egg (1 large) – This creates the golden, glossy finish on your mummies. For an egg-free option, brush with plant-based milk instead (though the color won't be quite as golden).
Candy eyes (optional but recommended) – These bring the whole spooky look together. Find them in the baking aisle near cake decorating supplies, or use dots of melted white and dark chocolate if you're avoiding artificial colors.
How to Make Gluten-Free Banana Mummy Treats
Step 1: Preheat your oven to 375°F and line your baking sheet with parchment paper or a silicone mat.
Step 2: Slice your banana lengthwise into halves or thirds, depending on your preferred mummy size. Halves create larger, more dramatic mummies (perfect for a Halloween dessert table), while thirds make bite-sized portions ideal for kids.
Step 3: Roll out your thawed puff pastry sheet on a lightly floured surface (use gluten-free flour if you're celiac-safe) and cut it into strips about ½ inch wide. A pizza cutter makes this incredibly fast and gives you clean edges.
Step 4: Place 3-4 chocolate chips along each banana piece, pressing them gently into the fruit so they stay put. The natural curve of the banana creates little pockets that hold the chocolate perfectly.
Step 5: Wrap each banana piece with the pastry strips, crisscrossing randomly and leaving gaps between strips. This is where you can get creative—uneven spacing and different angles make them look more authentically mummy-like. Don't worry about perfection; the messier they look, the spookier they'll be.
Step 6: In a small bowl, whisk your egg until smooth. Using a pastry brush, lightly coat each wrapped mummy with egg wash. This step is what gives you that beautiful golden color and slight shine.
Step 7: Bake for 12-15 minutes, watching for the pastry to puff up and turn golden brown. Your kitchen will smell amazing—like a bakery crossed with a banana bread recipe.
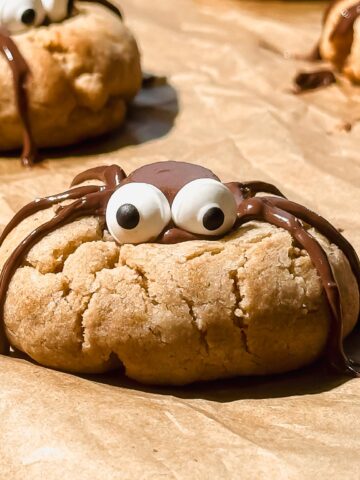
Step 8: Let the mummies cool for 5 minutes (they'll be molten-hot inside), then add candy eyes by pressing them gently into the still-warm pastry. If using melted chocolate for eyes, wait until they're completely cool or the chocolate will just slide off.

Tips for Perfect Halloween Mummies
Work with cold pastry – If your puff pastry gets too warm while you're working, pop it back in the fridge for 10 minutes. Warm pastry tears easily and won't puff properly in the oven.
Don't overwrap – Leave those gaps! The exposed banana and chocolate create visual interest and prevent the pastry from getting soggy. Think actual mummy bandages, not a burrito.
Serve warm – These are best enjoyed within an hour of baking when the chocolate is still melty and the pastry is crisp. If you need to make them ahead, reheat in a 350°F oven for 5 minutes to refresh the pastry.
Make them allergy-friendly – Use dairy-free chocolate chips and check your puff pastry label to ensure it's also dairy-free. Most gluten-free puff pastries are naturally nut-free, making these safe for classroom Halloween parties.
Get creative with decorations – After adding eyes, try dusting with powdered sugar for a ghostly effect, or drizzle with melted white chocolate for extra "bandages." You could also use sliced almonds as fingernails for a creepier touch (just check for nut allergies first).
Making These Kid-Friendly
This is one of those rare gluten-free Halloween desserts where kids can actually help with every step. Let them cut the banana (with a kid-safe knife), arrange chocolate chips, and especially wrap the mummies—they love making the "bandages" messy and spooky. It's a great way to spend a rainy October afternoon, and the hands-on activity makes them even more excited to eat the final product.
My niece, who's notoriously picky, devoured three of these last Halloween. Something about the interactive presentation and familiar flavors (banana and chocolate) makes them appealing even to skeptical young eaters. They're also small enough that kids can eat them without the massive sugar crash that follows a pillowcase full of candy.
If you're bringing these to a school party, label them clearly as gluten-free and note any allergen swaps you made. Teachers and parents of kids with food allergies will genuinely appreciate having a safe treat option that doesn't look "different" from what other kids are eating.
Storage and Make-Ahead Tips
Room temperature: These keep for 2-3 hours at room temperature, loosely covered. The pastry starts to soften as they sit, so they're truly best enjoyed fresh.
Refrigerator: Store in an airtight container for up to 2 days. Reheat in a 350°F oven for 5-7 minutes to crisp up the pastry. Microwaving makes them soggy.
Freezer: You can freeze unbaked mummies on a parchment-lined baking sheet, then transfer to a freezer bag once solid. Bake from frozen, adding 3-4 minutes to the baking time. This is perfect if you want to prep them the week before Halloween and bake fresh for your party.
Prep ahead: Cut your pastry strips and banana pieces up to 4 hours ahead, storing them separately in the fridge. Assemble and bake just before serving for the freshest result.
Frequently Asked Questions
Absolutely! If you're not avoiding gluten, standard puff pastry works perfectly and is usually easier to find. The technique remains exactly the same. Just keep in mind that regular puff pastry often contains butter, so it won't be dairy-free.
I've had great success with Schar and Geefree brands. Both puff nicely and have a good flavor. You can find them in the freezer section of most grocery stores near the gluten-free products, or order online through specialty retailers.
Tuck the chocolate chips completely inside the banana before wrapping, rather than letting them sit on top. The banana and pastry layers protect the chocolate from direct heat. If using larger chocolate chunks, stick with smaller pieces or mini chips.
Yes! Use dairy-free chocolate chips and brush with plant-based milk instead of egg wash (almond milk or oat milk work well). Check that your gluten-free puff pastry is also dairy-free—some brands use butter while others use vegetable shortening.
The most common culprit is pastry that was too warm when it went into the oven. Puff pastry needs to be cold for the layers to steam and separate properly. Also, make sure your oven is fully preheated—putting pastry in a cold oven will cause it to just melt instead of puff.
Bananas are ideal because they're sturdy enough to hold up during wrapping and baking, but strawberries or pear slices could work in a pinch. Avoid juicy fruits like oranges or watermelon, which will make the pastry soggy.
More Gluten-Free Halloween Ideas
If you love these spooky banana mummies, you'll definitely want to bookmark my collection of gluten-free Halloween recipes for more festive treat ideas. Pair these mummies with my Gluten-Free Halloween Dirt Cups for the ultimate spooky dessert spread, or try my Ghost Pretzels for another kid-friendly option.
Need a cozy dinner before trick-or-treating? My Gluten-Free Chicken Cornbread Casserole is perfect for a quick weeknight meal, or try the White Bean and Bacon Soup for something warming on a chilly October evening. And if you're planning ahead for Thanksgiving, my Roasted Whole Chicken technique will serve you well all season long.
Why These Belong on Your Halloween Table
In a sea of neon-colored candy and processed treats, these gluten-free chocolate banana mummies stand out as something genuinely homemade, relatively wholesome, and undeniably cute. They prove that gluten-free Halloween treats don't have to taste like cardboard or require a culinary degree to execute.
The fact that they're naturally gluten-free, easily made dairy-free, and nut-free means they're inclusive for Halloween parties where kids have varying dietary needs. Most gluten-free puff pastries are naturally free of the top allergens, making these safe for classroom parties and trick-or-treat exchanges.
As someone who spent years watching others enjoy treats I couldn't have, creating recipes like this—that everyone can safely enjoy together—matters deeply to me.
These gluten-free banana mummies are my signature Halloween dessert—requested by friends every October and devoured faster than candy corn. They're festive, allergy-safe, and spooky enough to impress any trick-or-treater. They're proof that the best gluten-free recipes aren't trying to mimic something else—they're delicious in their own right, happening to be gluten-free along the way.
Ready to make the gluten-free Halloween treat everyone will be talking about? Grab your puff pastry, raid the fruit bowl, and spend 20 minutes creating something that'll have guests asking for the recipe.
Loved this recipe? Tap the ⭐️ to leave a rating and tag me on Instagram @theglutenlessmaximus—your spooky bakes make my October!
Shop the gluten-free products I use: Shop my favorites
Save 15% on gluten-free crackers: Use code KATE15 at Ella's Flats for 15% off.

Gluten-Free Chocolate Banana Mummies
Equipment
- Parchment paper or silicone baking mat
- Sharp knife or pizza cutter
- Pastry brush
- Small Bowl
Ingredients
- 1 sheet gluten-free puff pastry thawed
- 1 ripe banana
- ¼ cup chocolate chips or chopped dark chocolate
- 1 large egg for egg wash
- Candy eyes optional but recommended
Instructions
- Preheat your oven to 375°F (190°C) and line a baking sheet with parchment paper.
- Slice the banana lengthwise into halves or thirds, depending on how big you want your mummies.
- Roll out puff pastry and cut into strips about ½ inch wide using a pizza cutter or sharp knife.
- Place 3-4 chocolate chips on each banana piece, pressing them gently into the fruit.
- Wrap each banana piece with puff pastry strips, crisscrossing randomly and leaving gaps between strips for that authentic mummy look.
- In a small bowl, whisk the egg until smooth. Brush each wrapped mummy lightly with egg wash.
- Bake for 12-15 minutes, or until the pastry is golden brown and puffed.
- Cool for 5 minutes, then add candy eyes by pressing them into the warm pastry (or use dots of melted chocolate).
Notes
Serve warm for melty chocolate inside
Store leftovers in the fridge up to 2 days; reheat in the oven to crisp up
Make dairy-free by using dairy-free chocolate chips and brushing with plant milk instead of egg
Can be frozen unbaked; bake from frozen, adding 3-4 minutes to baking time