Ah, brownie kabobs! Just the name itself is enough to make your mouth water, right? But wait, we're not talking about brownie kabobs – we're diving into the gluten-free zone, making this delicious treat accessible to everyone, dietary restrictions or not. In this post, I will guide you through crafting the perfect gluten-free brownie kabobs that'll have everyone returning for seconds. Expect to learn the steps to create this delectable dessert and some neat tricks and insights that'll elevate your dessert game!
Explore the science behind gluten-free baking here.

Key Ingredients
- Gluten-Free Brownies: The star of the show, providing a dense, chocolatey base that's irresistibly indulgent. Opting for gluten-free ensures everyone can join in on the fun, without compromising on taste or texture.
- Strawberries: These bring a pop of color and a burst of tangy sweetness, cutting through the richness of the brownies. Their juiciness and bright flavor elevate each bite.
- Bananas: Adding a creamy, mellow sweetness, bananas complement both the chocolate and strawberries beautifully. They also add a lovely soft texture that contrasts nicely with the dense brownies.
- Dark Chocolate: Drizzling melted dark chocolate on top isn't just for show; it adds an extra layer of chocolatey goodness that makes these kabobs downright irresistible.
Looking for more gluten-free treats? Check out these maple roasted cashews with cinnamon.
Step-by-Step Guide
- Bake Your Gluten-Free Brownies: Whip up a batch of your go-to gluten-free brownies. Let them cool down completely before you start slicing to avoid crumbles and ensure neat, bite-sized pieces.
- Prep Your Fruits: Get your strawberries and bananas ready. Make sure strawberries are hulled and bananas are sliced not too thin to avoid breakage but thick enough to hold their own on the skewer.
- Assemble Your Kabobs: Start skewering, alternating between brownie pieces, strawberries, and banana slices. The goal is to create a colorful and enticing pattern that's as pleasing to the eye as it is to the palate.
- The Chocolate Drizzle: Melt your dark chocolate until it's smooth and glossy. Then, using a spoon or a piping bag, drizzle it generously over your assembled kabobs, ensuring each one gets a lovely coating of chocolate.
- Chill and Serve: Let your kabobs set in the fridge for a few minutes to allow the chocolate drizzle to harden. Then, serve and watch them disappear!
Discover top gluten-free cereal brands for a perfect breakfast here.

FAQ Section
To keep your fruit skewers fresh overnight, wrap them tightly in cling film or place them in an airtight container in the fridge. This will prevent the fruits from drying out and keep them juicy and vibrant.
Absolutely! You can assemble your fruit skewers a day in advance. Just ensure they're kept refrigerated and covered to maintain their freshness. Add the brownie pieces closer to serving time to avoid getting too moist.
Flat brownies can result from overmixing the batter or not using enough leavening agent. Ensure you follow the box instructions to the letter, and try not to overbeat the mixture.
If your brownies didn't turn out as expected, don't fret! Crumble them up and use them as a base for layered dessert cups, mix them into ice cream, or, as in this recipe, skewer them with fruits and drizzle with chocolate for a delightful treat.
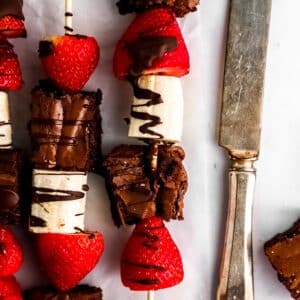
Gluten-Free Brownie Kabobs
Equipment
- Bamboo skewers
- Baking pan
- Microwave-safe bowl for melting chocolate
Ingredients
- 1 batch of gluten-free brownies cooled and cut into small slices
- 1 pint of strawberries hulled
- 2 bananas sliced into 1-inch chunks
- 3.5 ounces of dark chocolate for melting
Instructions
- Prepare gluten-free brownies and cut into bite-sized pieces.
- Hull strawberries and slice bananas.
- Alternately thread brownie pieces, strawberries, and banana slices onto skewers.
- Melt dark chocolate and drizzle over assembled kabobs.
- Chill briefly to set chocolate, then serve.
Notes
If making ahead, add brownies to skewers closer to serving time to maintain freshness.

